Fixing Typical Boot Problems

No matter how good our beloved Windows operating system has become, one has to expect that occasional problems with the boot process will arise.  If you are a loyal Slick IT reader, you will have already read our article and made yourself a boot disk and already understand how the boot process works. Today, we are going to look into some common fixes for boot problems that IT techs everywhere are sure to have run into.

This article is applicable in some way shape or form to all versions of Windows, but primarily the information given here is for Windows Vista, Server 2008, Server 2008 R2 and Windows 7. These newer flavours of Windows have a modified boot process that has both advantages and some quirks as compared to the NT/XP flavoured boot.

The first one that is 100 specific to the New NT 6.0 and later kernel, is problems in the Boot Configuration Database (BCD). Typically, this issue presents itself with an error message like “Windows could not start because of a computer disk configuration problem”; “Check boot path and disk hardware”; or “Could not read from the selected boot disk.”

These error message most often come from the careless deletion of the BCD but can also occur from disk issues resulting in BCD corruption or the addition of a partition that has somehow changed the name of the volume.

To fix this, simply log in to the Windows Recovery Environment and run the following commands: bootrec /scanos and bootrec /rebuildbcd. You will also find that the bcdedit.exe tool has some other options availoable that may be of use.

Common to all versions of Windows starting with NT is the infamous “Missing Operating System”; “Invalid Partition Table”; or the “Error Loading Operating System”.

The cause is simple. Ninety-Nine per cent of the time this is due to corruption by due to hard disk errors. Viruses and poorly written device drivers may also be responsible for corruption of the Master Boot Record (MBR).

Fortunately, this is also the easiest of all of our boot problems to fix.  Simply  run bootrec /fixmbr from a boot disk or the Windows Recovery Environment.

Many of you have probably run into “BOOTMGR is missing”. This too, is a result of corruption and is equally easy to resolve. Simply running bootrec /fixboot should clear this up.

Our final cause of boot problems may often be the most serious.

When Windows is reporting that operating system files and/or xxx.dll is missing, you should immediately suspect disk issues.  This particular error may be indicative of many files missing and not just the one listed.

Often it is easier to just reinstall the OS, but if you are in the mood to try and recover from this, you will need to launch the Windows Recovery Environment and try to find the files needed on a Windows disk or in the \Windows\winsxs\backup folder. Or, failing that, try to find and copy the file from another running machine in your network – just ensure that it is from the same service pack and OS

These tips in unison should allow you to recover from almost all boot failures. If all else fails, go for the windows repair install and cross your fingers.

Hope these help.
HP 2600n Print Queue Issues

As of late, I have become increasingly irritated with HP and the general crappiness of its products. A good HP product is now, in my opinion, akin to a good karaoke machine – the point being that neither of these really exist!

Today I had the joy of working with an HP 2600n. It should have been a really easy fix – a few users were complaining that documents were stuck in the print queue and they could not delete them – nothing stopping and restarting the spooler service won’t fix, right?

In fact, that did fix the issue. Instantly, the jobs were deleted out of the queue. Great!….Let’s just print a test page from the server to make sure that it is really working. I open up properties, select the test page and click on OK – within seconds a test page is popping out of the printer.

Fantastic!!! It works.

But then, one of the users tries to print a document to the shared printer.

Nothing happens…and the job is stuck in the queue again. What the hell?  I clear the queue and print a test page – bam, test page instantly pops out.

As it turns out, this particular model of HP printer, along with a plethora of other HP printers was not really designed to be shared off of a Server 2003 platform. These “cheap” network printers are actually not fully PCL compliant and are designed to work with HPs Print software and installed drivers but not using the standard drivers that you would install on a typical print server.

The fix, luckily, is easy. If you are having the same issue I had, simply go into the properties tab on the printer and uncheck the “Enable Bi-directional communication”. Apply the change, and your printer will work flawlessly.

But, HP you are not off the hook for this. Making printers and marketing them as network printers knowing full well that these won’t work well when shared out is absolutely unacceptable! As I mentioned in the first part of this blog entry, I have increasingly been spending far too much time troubleshooting nonsense – please count my clients and I out for any future HP purchases.

Upgrade Windows 7 RC to RTM

Greetings everyone….

This is a post that I am really pleased to make. In fact, ecstatic would probably be a better word.

For the last month I have been stewing about how to get my Windows 7 RC release upgraded to the RTM. Microsoft’s official line on this is that upgrades are not possible and the only way to do such was a fresh install.

This was really a very frightful thought for me. I have been using the RC as my primary operating system and it worked so well that it basically got tweaked into a more permanent set up than what an RC release should ever be.  Rebuilding this guy would have been a lot of work!

Well, today I found a workaround. A lot of other people had been talking about this, and of course it is not supported by Microsoft, but it worked great and it is really simple.

All you have to do is download the same release as your installed version, unpack it using WINRAR, 7Zip, or some other suitable program browse to the sources folder. Inside of that, you will find a file called cversion.ini. Open this up in notepad, change the minversion parameter to 7100 and save it.

Now, you are ready to upgrade. Copy the installation files onto a USB key, and run setup .exe. You will now be allowed to upgrade. It really is that easy!!

Enjoy!!!!!!

Manual Removal of Malware

So, I am sure most of you have been there. You just downloaded this great little free app from freeware heaven, clicked “next” through the series of endless disclaimers and dubious EULA’s, and have now watched the progress bar hit 100 per cent.

You fire up the new program and notice that it has now executed IE at the same time and has brought you to a page telling you that your system is infected. Damn, Damn Double Damn….haven’t I been down this road before?

Well, at least it didn’t lie. Your machine truly is infected and the longer it stays this way, the worse off you’ll be.

Malware is more than a nuisance though; it is an honest-to-god security threat and any real computer professional will give this class of software the prudent respect it deserves. Malware costs the world billions of dollars in lost productivity and is responsible for an unimaginable amount of identity theft and fraud. You may be inclined to chuckle at the colourful new icon that has been magically installed in your system tray, but this truly is no laughing matter.

Luckily, there are a ton of good tools out there that can deal with Malware reasonably well and are freely available. This article isn’t about recommending any of them (although I will plug an excellent product called Combo Fix recommended to me by Kevin, one of my co-workers) but rather this is for the unfortunate souls that have already run a program only to see that their malware is still alive and well.

So, where do we start.  Sometimes malware can be ridiculously easy to spot. Simply opening the task manager will show you a process that you know shouldn’t be there and allow you to terminate and remove it. Then opening up MSCONFIG and disabling/deleting the startup item stops it from ever coming back. Great!  But this does sound too easy, doesn’t it.

Modern malware almost never lends itself to easy removal and if it did, that nifty little program you downloaded to cleanse your system would have grabbed it anyway. Malware nowadays usually consists of several parts/processes and these processes work together to ensure that when one process is terminated, the other will fire it right back up.  This is a cat and mouse game that you will not win using standard Windows management tools.

What I recommend doing, is downloading process explorer from Sysinternals. This tool will be invaluable in your fight against rogue software and will give you the weapons you’ll need to be victorious. Download Here.

Open up process explorer and you will now be privy to all sorts of system information that task manager doesn’t have (although the Windows 7 task manager is greatly improved).

Now look for processes that look unusual. Watch how your system behaves and look for processes that suddenly appear in the list when the malware itself executes. By default, these will be highlighted green and easy to see.

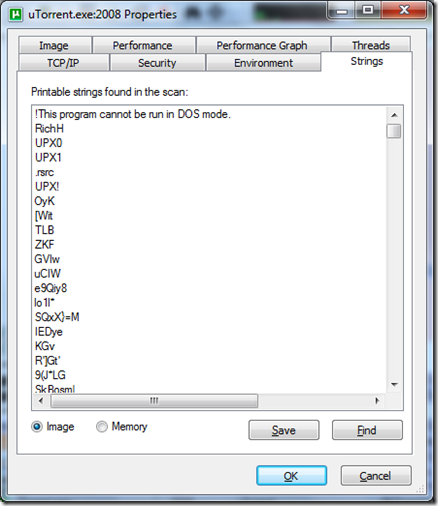
Now, when you find something unusual, double click on the process and go to strings tab. Look for something in there such as .com since most malware out there is designed to make some sort of a connection to a website to steal information or redirect your browsing experience in some way.  Use your best judgement – if it is pointed to www.blackhathackerz.com that might be a clue that this file should not be there.

 image

Once you have found your suspect exe file, do not kill it. Instead right click on it and suspend the process. This will prevent the other parts of the malware from restarting it as the program is still loaded in memory but just suspended and not terminated. Go through and suspend all of the suspect processes that appear. Then, once you are sure that you have got them all. Terminate them. (make a note of where they are located first in the environment tab in process explorer.)

Now, simply go through and delete the files off of your disk and clean up any registry entries that the product may have made. Use msconfig to disable any additional startup locations. Remember always export your registry and keep it safe before modifying your registry in any way.

Manually removing spyware doesn’t have to be painful. Nevertheless, some malware is going to involve a lot of work to track down on your part, but you will find that in time you will become more proficient at it and be able to clean machines up very quickly.

Last piece of advice, however. If you find yourself dealing with a root kit please disregard all that you have learned here today. There really is no way of trusting any machine that has been infected with a rootkit and your best bet is to just format windows and reinstall the OS.

I hope that this little tutorial helps!

Cheers.

Understanding Disks and Disk Management

Well, today’s post isn’t a fix per se. It isn’t even a tutorial, but I think that the information contained herein is invaluable for understanding disks and troubleshooting disk management issues.

A lot of us have a real rudimentary understanding of how disks and volumes are managed in Windows. Most of this comes from the overly simplistic and dumbed down models that we are given when studying for the A+ designation or it is an understanding that we gained long ago when FAT32 was the predominant file system in use.

A lot has changed since then, and I want to take you on the journey to understanding what is actually happening behind the Disk Management MMC.

So let’s begin at the root of disk management in modern versions of Windows. That swanky mmc that we all know and shown below is actually loaded through a Windows dll named dmdskmgr.dll. The functionality of this dll is simple. When it is loaded into memory it will in turn scan disks attached to the system looking for a LDM database. If it finds disks from the local computer, it will simply report the volumes that are present, however, if it happens to find an LDM from a foreigner computer it will then execute the import disk mgr which essentially just copies the foreign LDM and adds it to dmdskmgr.dll’s in memory copy of the database. Should you choose to import the disk, then it is essentially just committing the database write operation to the foreign disk which is actually done through a kernel mode dll called volmgrx.sys. Volmgrx.sys is actually the workhorse behind dmdskmgr.dll as it control the access to disk objects such as the LDM and the resident volumes.

image

Understanding this process alone goes a long way in troubleshooting why a disk might not be recognized or importable etc. While entirely out of the scope of this article, one could actually write a tool to manipulated the LDM itself and allow you to fix issues on a disk at a very low level.

Now, how does volmgrx.sys actually work. This is actually fairly straightforward in most cases.  Disks all contain disk relative offsets which are essentially a number of sectors from the start of a partition table to the actual partition itself.  The job of volmgrx.sys is to simply add the volume-relative offsets to the disk-relative offsets and allow the operating system to map I/O to the underlying partitions themselves.

On a multi-partition disk setup using spanned, mirrored, or some other flavour of RAID, thsi naturally becomes more complex. It is NTFS iself that allows us to create these types of volumes.

NTFS creates a bitmap file that can be added to or reduced at will. It is this file that tells the volmgrx.sys kernel mode dll where a logical volume begins and ends. Thus, to the OS itself the drive appears to be just a normal drive. In the days of FAT this was not possible as the whole partion table would have needed to be moved and thereby dislocating the data on one partition from the other. Then the volmgrx.sys will keep referring to the bitmap created to determine where free clusters are located and will logically write to these as necessary.

This process is virtually identical for all of the multi-partitioned types except for RAID 5 arrays where obviously the parity bit is also striped across the drives.

One last area that I would like to touch on is mirrored volumes. Some people have asked me why Windows cannot boot from spanned drives, Raid 5 arrays etc., but yet can boot from a mirrored volume which is a multi-partitioned volume.  The answer to this is simple. The Master Boot Record code sees the disk as one volume and only boots from half of the mirror which is marked as the boot volume.

Anyway, I hope this goes a long way toward helping you understand at a deeper level how Windows manages disks. I also want to give proper credit to Mark Russinovich et al. for the inspiration to write this article. Most of the material comes from his Windows Internals fifth edition book and I highly recommend this book for anyone who wants to understand Windows at a Engineering level.

Cheers.


Copyright © 2010 Paul Guenette and Matthew Sleno.